
In this article, I’ll go over the pros and cons of a single x86_64 server vs an ARM Cluster, as well as show you how you can set up your own ARM Cluster with Docker Swarm, GlusterFS, Traefik, and Ansible. I focused on achieving a balance between ease of setup, ease of use, and computing power. If you have any ideas about how to make things even easier, email me.
If you listen to the advice of certain selfhosting communities, the best way to go about hosting your services is to head over to eBay and buy a used Poweredge R710. If you don’t particularly care about your environmental impact (you should though), and are ok with the downfalls listed below, this is absolutely true. You can pick up a 12 Core @ 2.8GHz, 72 GB RAM, 2TB HDD server for about $200 (USD) after shipping.
With a modular ARM cluster (like what we’ll be building in this article), you would have a zero to low-noise, low energy consumption, low power, fully modular cluster that is up to most tasks that the x64 server could do. If I need more computing power or storage space, I can just plug in more hardware and everything will be automatically rebalanced as necessary.
For me, the benefits for ARM outweigh both the benefits of x64 and the cons of ARM, making it the obvious choice. Here are a few things you may want to consider when choosing one…
| x64 PRO | x64 CON | ARM PRO | ARM CON |
|---|---|---|---|
| Fast | Runs hot | Fully Modular | Slower |
| Excellent Software Support | Electricity costs* | Runs Cool + Quiet | Higher initial cost |
| More Popular | Noisy | Low Power Consumption | Worse software support |
| Large | Small | Less popular |
* I found that it costs almost an order of magnitude more in electricity (to the tune of hundreds of $$$ per year) to run a traditional x64 server.
There’s also, of course, the option of combining x64 servers and ARM servers in your cluster. Things that need a lot of power (video encoding, streaming PC games, etc) might need an x64 server. Nothing prevents you from combining the two in Docker. The x64 server which can go to sleep while not in use and then wake on LAN when required.
Okay, lets get into building an ARM cluster.
Hardware Choices
(I’m not going to link to vendors, but a full parts list is at the end of this section.)
SBC
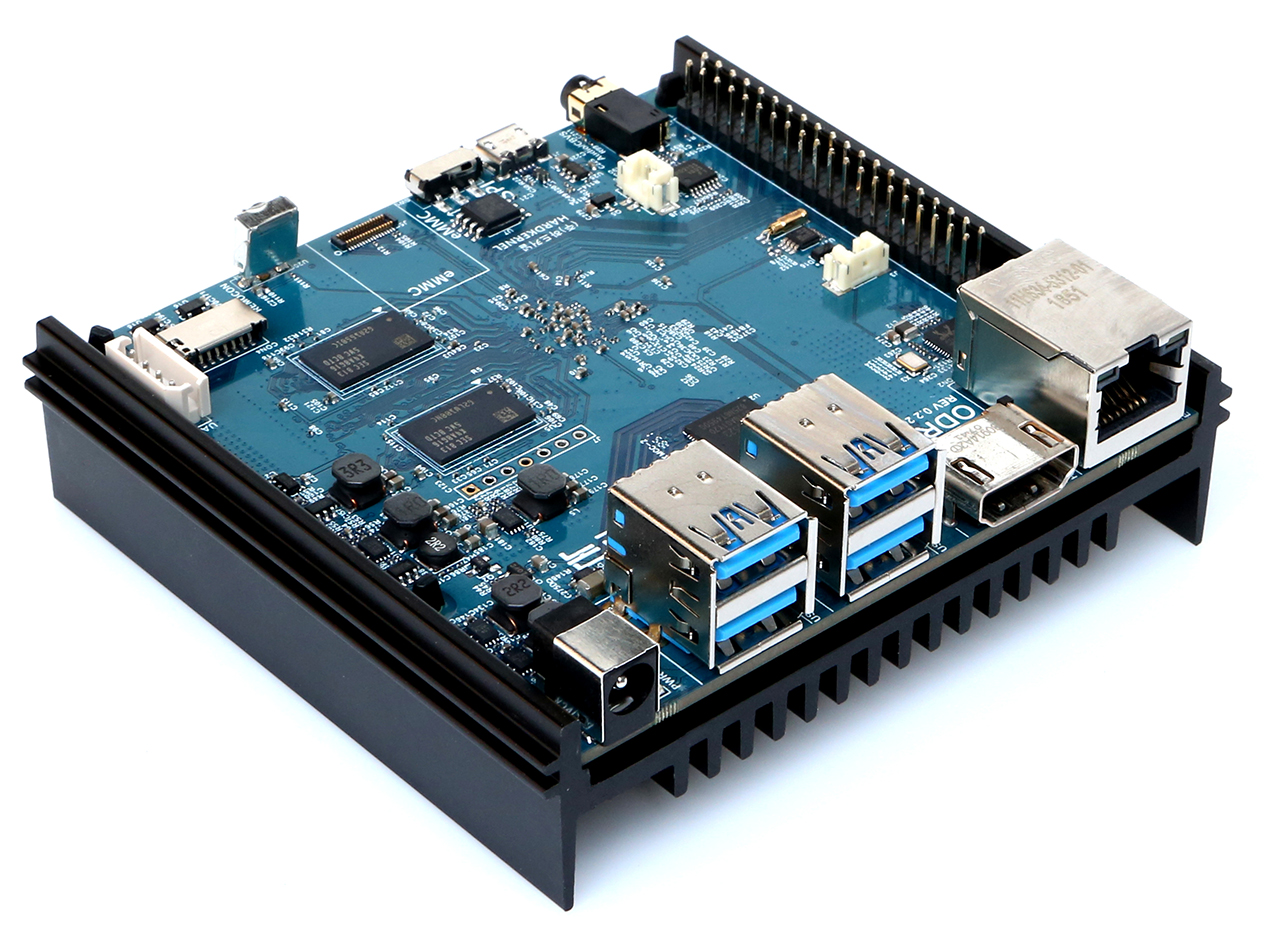
I went with the Odroid N2 as the main compute board for my cluster. This is the fastest/newest SBC that Odroid makes, and they don’t have any moving parts (complete silence). Of course, they’re in high demand right now (relative to supply at least), so it might be easier to get your hands on a different SBC. It also might be cheaper, since the XU4 for example is about half as fast but also less than half the price.
The neat thing about clusters is that they are completely modular. If you need storage in your cluster, you can add in an SBC that deals with storage. For example, if I needed more storage space I would get an Odroid HC2 and drop a hard drive in it.
You can mix and match as many decently fast SBCs to get exactly the right set of features you need. A word of warning though: stay away from the Raspberry Pi! The Pi 3 is sort of fast, but you can do much better for $35. The Pi is an excellent project that made SBCs mainstream (my first one was a Pi 1) and it’s definitely worth supporting, but if you try to run more than one thing on one, you’re not going to have a good time.
Power
Some people opt to buy a single 12V power supply to power their entire cluster. I didn’t want to work with wires so I just bought the cheapest UL-Listed 12V@4A power supplies I could find. One for each board.
Networking
Any gigabit switch should be fine. I found one lying around and repurposed it. Any cables that are Cat 5e or better should also be fine.
Parts List
- 2x Odroid N2
- 2x Odroid MMC Chip (For OS)
- 2x 32 GB SD Card (For Storage)
- 2x 12V@4A DC Jack Power Supplies
- 2x Short Cat 5e Cables
- 1x Long Cat 5e Cable
- 1x Gigabit Switch (5 Port)
- 1x 3D Printer (Optional)
- Used to print stacking mounts.
Software Choices
Docker (Swarm Mode)
A lot of people don’t like docker because “why run VMs for everything when you can just run things bare metal?” If you’re willing to configure multiple copies of a bunch of software and have to maintain updates yourself, then sure.
That makes it harder to setup and maintain though. Docker means we can use existing images and configuration, and if they don’t work then we can just find a different one to use (or write our own very easily). Sometimes projects will even have official docker images! This may not be the “purest” way of setting up a server, but it is by far the easiest.
Issues with this method include…
- Security (who made the image?)
- Ease of Debugging (somewhat circumvented by just deleting it and restarting)
- If a docker image doesn’t already exist you need to make one. This is generally rare.
GlusterFS
Docker Swarm will automatically pick which server to run a service on. Unfortunately, it doesn’t sync persistent data across servers (which means your services won’t actually work). With GlusterFS, any server can access the data on the gluster mount.
It has a few different modes, but the one I use is duplication (every board keeps a copy of all the data). If I had more than two boards I would keep duplication at 2x, so I get the benefit of redundancy while also getting more storage space.
Portainer
Portainer allows you to manage your Docker Swarm through a web interface and makes pretty visualizations. You could do without this but deploying new apps (and more importantly, checking system state) from a GUI is significantly easier (and it’s cool).
Traefik
Traefik does three things for us.
- Acts as a reverse proxy between your services and the internet.
- Manages subdomains without additional configuration (set subdomains from Docker).
- Maintains Let’s Encrypt Wildcard certificates automatically.
You could use HAProxy or Nginx, but Traefik looked like the easiest to setup.
Software Setup
Most SBCs come with Ubuntu and a preconfigured user. To avoid getting confused as to which board is which, you’ll need to do a bit of one-at-a-time setup. If you have a bunch of different networks (for whatever reason) or a smart plan to identify boards, do this in parallel.
After SSHing in with the default login and switching to root…
(Disclaimer: Make sure you know what you’re doing. I’m obviously not responsible for what you do based on this guide. Try not to break things.)
# Change hostname
echo MY_HOSTNAME > /etc/hostname
hostname MY_HOSTNAME

# Add user
adduser MY_USER # INTERACTIVE
usermod -aG sudo MY_USER

# Disable Xorg
sudo systemctl set-default multi-user.target

# Update
apt update
apt full-upgrade
reboot

# Install Gluster
sudo apt install software-properties-common
sudo add-apt-repository ppa:gluster/glusterfs-3.8
sudo apt update
sudo apt install glusterfs-server
Odroid boards have weird locale errors when you login. If you see one and live in the US (en_US) then you can fix it by…
# Locale Setup
locale-gen en_US.UTF-8
dpkg-reconfigure locales
dpkg-reconfigure keyboard-configuration
localedef -i en_US -c -f UTF-8 en_US.UTF-8
reboot
GlusterFS
I followed this handy guide to setup GlusterFS. The following is a summary. The .local domain names are setup automatically by Avahi. If they don’t work for you, you might want to setup an overlay network so that the nodes have nice names.
Make a directory with these files in it…
inventory.yml
[gluster]
one.local
two.local
Test to see if it worked with ansible -i inventory.ini all -m ping.
playbook.yml
# This snippet was moved to github gists.
# My blog parses nunjucks templates inside this file before it parses the
# markdown, meaning that this file won't render properly.
# I need to fix that at some point.
# https://gist.github.com/nikhiljha/4eec002b1f098c27fb6c65652b4f31d3
Be 100% sure to edit those values! This configuration WILL wipe mmcblk1 and lead to permanent data loss! Be very certain you’ve read through it and understand what it does before running it.
ansible.cfg
[defaults]
remote_user=EDITME
And then run the playbook with ansible-playbook -i inventory.ini playbook.yml --extra-vars 'ansible_become_pass=YOUR_REMOTE_USER_PASSWORD_GOES_HERE'.
Tada! You have gluster configured! SSH into any node and run gluster volume status to make sure everything is online. If it isn’t, you can try to fiddle with things until they work. Also make sure everything comes up properly after a restart. I didn’t do this and I ended up having to do some tedious work copying everything off the volume, reconfiguring gluster, and copying everything back.
Docker Swarm
Setup should look something like this…
# install docker
apt install curl
curl -fsSL get.docker.com -o get-docker.sh
sh get-docker.sh
sudo usermod -aG docker njha

# The following runs on exactly ONE node...
# docker swarm init
# docker swarm join-token manager

# Run the command (that the second command gives you) on the other nodes.
Deploy Portainer
You can run these commands on any of your nodes.
# Install Portainer
mkdir -p /mnt/g1/stacks
cd /mnt/g1/stacks
curl -L https://downloads.portainer.io/portainer-agent-stack.yml -o portainer-agent-stack.yml
mkdir -p /mnt/g1/portainer

# remove the docker volume and replace it with /mnt/g1/portainer
vi portainer-agent-stack.yml

# deploy to cluster
docker stack deploy --compose-file=portainer-agent-stack.yml portainer
You can access Portainer at EITHER IP at whatever port you configured in the portainer-agent-stack.yml. For example, if node one is 192.168.1.100 and node two is 192.168.1.101, and your portainer port is 9000 - then BOTH http://192.168.1.100:9000 and http://192.168.1.101:9000 will connect to Portainer thanks to Docker magic!
Neat. You have Portainer running! Try poking around a bit and explore the menus. Once you get bored of that, it’s time to install Traefik.
Deploy Traefik
First we should create a network so that all our services can talk to each other. You can do this in the Portainer GUI. Make a new network called web with the driver set to overlay. The defaults are fine for everything else.
To configure Traefik…
mkdir -p /mnt/g1/traefik
cd /mnt/g1/traefik
vi traefik.toml # What to put in this file is below.
touch acme.json # This file is auto populated by Traefik.
chmod 600 acme.json # It contains secret information, protect the file.
This is traefik.toml. If you’re not using Cloudflare, head over to the Traefik documentation and adapt accordingly. This config will get certificates for *.example.com and example.com.
debug = false

logLevel = "ERROR"
defaultEntryPoints = ["https","http"]

[entryPoints]
  [entryPoints.http]
  address = ":80"
    [entryPoints.http.redirect]
    entryPoint = "https"
  [entryPoints.https]
  address = ":443"
  [entryPoints.https.tls]

[retry]

[docker]
endpoint = "unix:///var/run/docker.sock"
domain = "example.com"
watch = true
exposedByDefault = false

[acme]
email = "your_email@example.com"
storage = "acme.json"
entryPoint = "https"
onHostRule = true
[acme.dnsChallenge]
  provider = "cloudflare"
  delayBeforeCheck = 0
[[acme.domains]]
  main = "*.example.com"
  sans = ["example.com"]
To deploy Traefik, just go to Portainer, select your cluster, click stacks, and paste this in:
version: '3'

services:
  traefik:
    image: traefik
    command: --docker --api --docker.swarmMode
    restart: always
    ports:
      - 80:80
      - 8080:8080
      - 443:443
    networks:
      - web
    volumes:
      - /var/run/docker.sock:/var/run/docker.sock
      - /mnt/g1/traefik/traefik.toml:/traefik.toml
      - /mnt/g1/traefik/acme.json:/acme.json
    container_name: traefik
    environment:
      - CF_API_EMAIL=your_email
      - CF_API_KEY=your_api_key

networks:
  web:
    external: true
Neat! You should be able to access the Traefik UI on port 8080.
Configuring Backups
I wanted to have a decent level of redundancy for this project, but ended up putting it off. I’m not storing anything that I’m not willing to lose yet - but when I do I’ll put up another blog post and edit this one with a link.
A pointer if you want to do this on your own: this docker image looks like the best backup solution to me.
Usage
Neat, now that we have all the groundwork, how do we actually deploy useful services on this thing?
Example Deployment: Feed Reader
I think Miniflux is the best self-hosted feed reader. It supports the fever API so you can use it with a lot of RSS clients, and it has a nice web UI. Miniflux has an official docker-compose.yml file, so we just do a little prep work…
mkdir -p /mnt/g1/miniflux… and then head over to Portainer to deploy a slightly modified config (just like we deployed Traefik) …
version: '3'
services:
    miniflux:
      image: miniflux/miniflux:latest
      depends_on:
          - db
      environment:
          - DATABASE_URL=postgres://miniflux:EDIT_THIS_PW@db/miniflux?sslmode=disable
      networks:
          - web
          - default
      deploy:
        labels:
          - "traefik.docker.network=web"
          - "traefik.basic.frontend.rule=Host:feeds.example.com"
          - "traefik.enable=true"
          - "traefik.port=8080"

    db:
      image: postgres:10.1
      environment:
          - POSTGRES_USER=miniflux
          - POSTGRES_PASSWORD=EDIT_THIS_PW
      volumes:
          - /mnt/g1/miniflux:/var/lib/postgresql/data

networks:
  web:
    external: true
Notice how we set deploy: labels: on the service that we want to expose. In this example, traefik will proxy all traffic that goes to https://feeds.example.com/ to a miniflux container running on port 8080. If Miniflux supports multiple servers to one database (I don’t think it does; untested), you can even click the scale button in portainer and have it automatically load balance things.
You might notice that Miniflux throws an error when you start it. Turns out you need to instantiate the database manually in the default Docker image. Just get a /bin/sh shell into the running miniflux image and do a quick…
/usr/bin/miniflux -migrate
/usr/bin/miniflux -create-admin
… to set things up before first use.
Congrats! Your feed reader should be up and running! Now just repeat the process for everything else you want to deploy (there’s a whole bunch of cool stuff here).
Potential Issues
- The Docker image you found only supports
x64and notARM. (No compatible nodes in the cluster error.)- Often times (especially for interpreted languages like JavaScript, Python, etc.) the actual application is fully compatible with ARM, but the Docker image is badly configured. If you can’t find an alternative image, try switching the base image to something ARM friendly and rebuilding the docker image.
- Gluster is being bad.
- Copy everything off and reset. Consider finding a more foolproof way of setting up Gluster and emailing me about it.
End
Enjoy your ARM cluster!